Discover in this article DIY table in epoxy resin: how to create an epoxy resin table yourself, one of the most inspiring decorative pieces of furniture for your living room. Following the logic of modernity, epoxy resin tables bring a touch of novelty to your interior. Start with an original idea to create an epoxy resin table.
👉Follow our step-by-step instructions for impeccable results.
What is an epoxy resin table?
An epoxy resin table is a wooden table covered with an epoxy resin. Epoxy resin is a synthetic resin that hardens when exposed to air and heat. It is often used to cover wooden tables to protect them from damage caused by water, grease and other substances. Epoxy resin is also very resistant to impact and heat, making it a great choice for tables that will be exposed to many people.
Epoxy resin can also be mixed with pigments or the powders to create custom designs and unique patterns. Epoxy resin tables have become very popular due to their sleek appearance, durability and ability to be customized.
The advantages of choosing an epoxy resin table in your decor?
Sustainability:
Epoxy resin tables are extremely durable and resistant to scratches, impacts, stains and water. They are therefore ideal for daily use, even in the most demanding environments.
Aesthetic :
Epoxy resin tables have a unique and customizable look. Pigments and powders can be mixed with resin to create a variety of colors and patterns.
Ease of maintenance:
Epoxy resin tables are easy to clean and maintain. The smooth surface won’t trap dirt or dust, and the epoxy resin is stain resistant.
Versatility:
Epoxy resin tables can be used in a variety of applications including as dining room, office, patio or kitchen tables. They can also be used as bar, console or end tables.
Environmental sustainability:
Epoxy resin tables can be made from recycled materials, making them an eco-friendly option for consumers concerned about the ecological impact of their purchases.
👉 Although there are many advantages to choosing an epoxy resin table, there are also some disadvantages to consider:
Cost :
Epoxy resin tables can be more expensive than solid wood or metal tables. The materials and techniques used to create custom designs can also add significantly to the cost.
Sensitivity to heat:
Epoxy resin can be sensitive to heat, so it is important to avoid placing hot objects directly on the table surface. Burn marks can be difficult to remove.
Sensitivity to scratches:
Although epoxy resin is scratch resistant, it can be scratched by hard or sharp objects. Scratches can be difficult to repair and can affect the appearance of the table.
Weight :
Epoxy resin tables can be heavy due to the density of the resin and the materials used to construct the table. This can make the table difficult to move or rearrange within a room.
Homemade :
Epoxy resin tables are often handcrafted, which can cause variations in appearance and quality from table to table. It is important to choose an experienced craftsman to guarantee consistent quality.
Modern living room decoration: the epoxy table is the guest!
Epoxy resin tables are an elegant and modern choice for decorating living room furniture.
Some ideas for incorporating an epoxy resin table into your decor:
Epoxy resin coffee table:
An epoxy resin coffee table can be the focal point of your living room. Personalized designs can add a unique touch to your decor, while the stain-resistant and easy-to-clean surface makes it a practical choice.
Epoxy resin side table:
A small epoxy resin table can be used as a side table for snacks or drinks. It can be placed next to an armchair or sofa for easy access.
Epoxy resin console:
An epoxy resin console can be placed against a wall for a decorative touch. Custom designs can add color and texture to a dull wall.
Epoxy resin dining table:
Epoxy resin dining tables can be used to add a modern touch to a traditional room. Custom designs can be coordinated with other dining room decor items, such as chairs and tablecloths.
Epoxy resin shelf:
An epoxy resin shelf can be used to display decorative items or books. Custom designs can add a unique touch to your decor.
DIY table in epoxy resin yourself?
Epoxy Table Kit
To make an epoxy resin table, you will need epoxy resin, catalyst, hardener, solvent, wetting agent, release agent, stripper, ‘an adhesive, filler, sanding and polishing tool.
The necessary quantity of epoxy resin to make a coffee table: example 80 x 40 x 2 (cm)
To calculate the amount of epoxy resin needed for an all-resin table top measuring 40 x 80 x 2 cm, we first need to convert these dimensions to liters. We multiply the length, width and thickness to get the total volume in cubic centimeters, then convert it to liters by dividing by 1000:
40 cm x 80 cm x 2 cm = 6400 cm³ 6400 cm³ ÷ 1000 = 6.4 liters of epoxy resin
So, to completely cover the surface of this tray with a thickness of 2 cm of epoxy resin, you will need approximately 6.4 liters of epoxy resin. Note that this calculation does not take into account the objects you wish to meter in the tray and the losses of epoxy resin that may occur during application, so it is advisable to allow a slightly higher quantity to avoid running out of resin .
Table that shows the approximate amount of epoxy resin needed based on different surface dimensions and epoxy layer thickness.
| Area dimensions | Layer thickness | Approximate amount of epoxy resin |
|---|---|---|
| 24″ x 24″ (61cm x 61cm) | 1/8″ (0,3cm) | 0.343 gallons ( US) (1,3 litres) |
| 36″ x 36″ (91cm x 91cm) | 1/4″ (0,6cm) | 1,312 gallons (4,968 litres) |
| 48″ x 24″ (122cm x 61cm) | 1/2″ (1,3cm) | 2,55 gallons (9,674 litres) |
| 60″ x 36″ (152cm x 91cm) | 3/4″ (1,9cm) | 6,92 gallons (26,2 litres) |
| 72″ x 48″ (183cm x 122cm) | 1″ (2,5cm) | 14,74 gallons (55,8 litres) |
Tutorial: how to make an epoxy resin table?
1) Video of the creation of my epoxy resin table home made

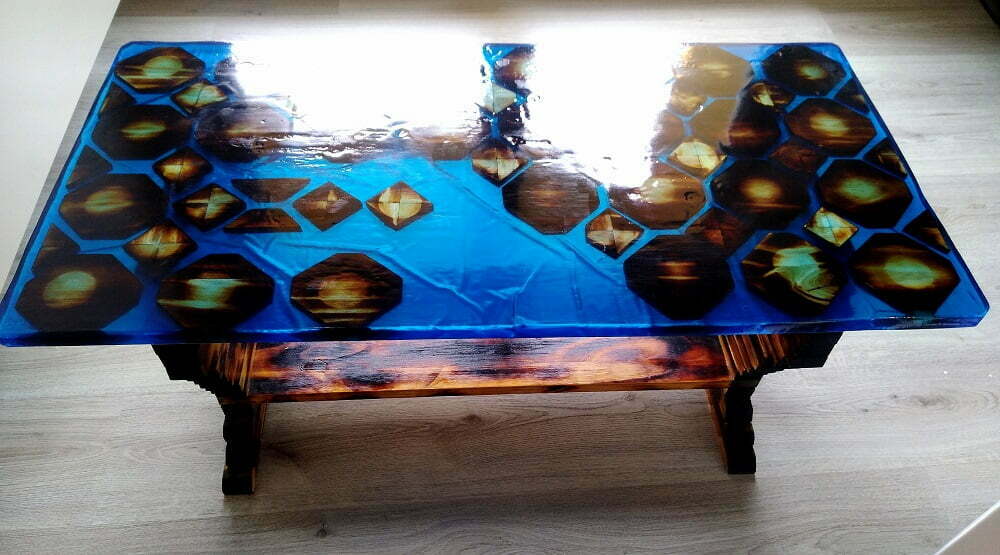
The origin of the inspiration for this epoxy resin table (the reflection of the moon on the water)
This epoxy resin table was entirely handmade, a creation inspired by a moment of contemplation. Sitting on my balcony, I was observing the stars when suddenly, an image came to my mind: a place where I spent unforgettable moments in Tigzirt sur mer.
Tigzirt is a small town located on the east coast of Algeria, where I grew up. Its cliffs, which have bordered the Mediterranean Sea for centuries, give it a unique charm, especially with the remains of the ancient Roman city. My mind transported me back to this place where I spent extraordinary times: swimming, fishing, having fun, admiring the incessant waves, but above all, contemplating the sunsets, the moon and the stars at night.
I came back to the present and decided that my next creation will be an epoxy resin table. I want to recreate the beauty of the sight of the moon shining in the water in the middle of the night, which inspired me for this creation. This is how this original epoxy resin table idea came to life.
2) Tutorial text on how to make an epoxy resin table yourself
Prepare the necessary materials and tools
It took me a lot of time to put together a diagram, how can I put my inspiration on a resin table where you have to mix the reflection of the moon on the water and dark colors in a single surface?
👉 After a few days I found the steps to follow:
The dark color:
I cut the wood into an octagon shape and into several pieces of wood, to give the appearance of a reflection of the moon. Because the moon shines on several places in the sea or ocean. So I cut pieces of pine wood and put them on a hot plate. The result far exceeded my expectations and above all a natural color.
Resin:
I searched on the internet for the resin best suited for the tables and I came across a site, where I placed an order of 7 kg, after 3 days the order was delivered. For the color of the water I chose dark blue, it is the color of the water at sunset.
How to mix epoxy resin?
Mixing epoxy resin is a fairly simple process, but there are a few important steps to follow to ensure the mixture is correct. First, you need to make sure both components are at the correct temperature. If any of the components are too hot or too cold, the mixture will not be correct. You should also make sure that the two components are mixed well before starting the mixing process.
Once you have verified that the two components are at the correct temperature and mixed well, you can begin the mixing process. It is important to follow the manufacturer’s instructions for the mixing process, as each type of epoxy resin may be slightly different.
Before I started I read the product instructions carefully even though I have experience. But as they say, resin is a material that loves attention and optimal concentration. I pour product A, I add product B to a bucket to the nearest gram, I mix for about 5 minutes and I add the blue dye. A magnificent result.
👉 Table top mold casting
the resin is fluid so I was careful that it didn’t escape, and have any unpleasant surprises.
- I start pouring the resin onto the mold, the resin spreads quickly between the pieces of pine wood. The first layer is finished, 5 mm thick. Epoxy resin is worked in several layers. Each pour should not exceed 1 cm, this is the recommendation to have an excellent result.
- Later after 6 hours I add the second layer, the pieces of wood start to drown forever in the epoxy resin. the next morning I add the last layer, all the wood is under the resin and already starting to shine.
👉 Unmolding the resin table top
- I forgot to mention it from the start, be careful, you have to put plastic or a release agent between the mold and the liquid resin, so that release would be easy. Because the resin does not stick to plastic materials and oils in general once cured.
- I wait 4 days after pouring, I start to unmold on the sides. Once finished I remove the tray completely.
👉 Sanding, polishing and buffing epoxy resin
- The resin table top is finally ready for finishing, I start sanding with 180 mm abrasive paper. Once finished I use 280, 600, 1200, 2400, and finally 4000 mm.
👉 Polishing and buffing
- I use a polishing paste on the cotton fabric, I rub gently and in circles until the resin starts to shine, all the scratches are gone and the plate becomes transparent blue.
- The resin table top is finally finished and my eye now on the table supports.
👉 The epoxy resin table support
- I want the support of this table to be original and natural too, I am starting to think about burnt wood. What I applied.
- I cut 34 planks of pine wood and I put them together with wooden dowels and glue them, once assembled I put them on an electric hob, watching of course, you have to make sure that they do not burn. Once the support is finished, all you need to do is assemble them with the finished epoxy resin tray.
- I fix the tray on the supports with pins and glue wood.
👉 Finishing the wood and resin table
- The resin table is on these legs, I prepare a transparent resin and I paint the supports with this resin to give a shiny appearance and protection against a possible impact in the house.
What precautions should be taken when working with epoxy resin? ⚠
When working with epoxy resin, it is important to take certain precautions to avoid health and safety issues. Here are a few tips :
– Wear gloves and protective clothing to avoid direct contact with the resin.
– Make sure the work area is well ventilated.
– Avoid breathing epoxy resin vapors.
– Clean all surfaces and tools thoroughly after use.
– Dispose of all waste resin in accordance with local regulations.
Final words
I am proud of the result obtained, it all started with an imaginary inspiration which ended with a magnificent indoor home table, which can also be used on terraces and balconies. An epoxy resin table is a fun and easy DIY project to make.
You can make a table of any shape or size, with or without legs. The possibilities are limitless. Epoxy resin is also a durable product, meaning your table will last a long time.