The creation of epoxy river dining tables is a growing trend in the world of interior design. These functional works of art combine the natural beauty of wood with the modern aesthetics of epoxy resin, creating unique pieces that captivate the imagination.
When it comes to designing an Epoxy River Dining Table, there are various customization options available. From choosing different types of wood for the table slabs to selecting pigments or dyes to color the epoxy resin, the design possibilities are endless. Whether you prefer a sleek and contemporary style or a more rustic and earthy feel, an Epoxy River Dining Table can be tailored to suit your personal taste and complement your existing decor.
In addition to their aesthetic appeal, Epoxy River Dining Tables are also known for their durability and easy maintenance. The epoxy resin coating provides a protective layer that helps prevent stains and damage from daily use, making these tables not only beautiful but practical as well.

Overall, an Epoxy River Dining Table serves as a statement piece in any home, adding a touch of sophistication and artistry to your dining area. Whether used for everyday meals or special gatherings with family and friends, this type of table is sure to impress with its exquisite craftsmanship and distinctive design.
DIY Epoxy River Dining Table in 8 Steps
1. Epoxy River Dining Table Kit: Necessary Tools and Materials
⚠ Having all these tools prepped and ready before pouring allows for a smooth and uninterrupted workflow, minimizing the risk of mistakes or delays. It’s a crucial step that sets the foundation for a flawless epoxy river dining table creation. ⚠
🛠️ Epoxy River Dining Table Kit Essentials:
- Epoxy Resin & Hardener
- Silicone Caulk
- Wood Planks/Slabs
- Wooden Frame/Mold
- Level
- Stir Sticks
- Cups for Measuring Epoxy
- Alcohol Inks/Dyes/Colorants (optional)
- Decorative Elements like Dried Flowers, Metals, etc. (optional)
- Sandpaper (Coarse to Fine Grits)
- Polishing Compounds
- Random Orbital Sander
- Variable Speed Polisher
- Polishing Pads
- Respirator/Safety Gear
- Torch or Heat Gun
- Wood Clamps
- Basic Woodworking Tools
The key aspects are the epoxy resin system itself, a mold or form to contain the epoxy river, and woodworking/finishing tools to prep and polish the final table top.
In addition to the tools mentioned earlier (frame, silicone, level, and epoxy resin), creating an epoxy river dining table requires a few other key materials:
2. What wood, what resin choose for a dining table epoxy and what decorative elements?
👉 How to choose wood for an epoxy teble?
Two slices of oven-dried walnut.
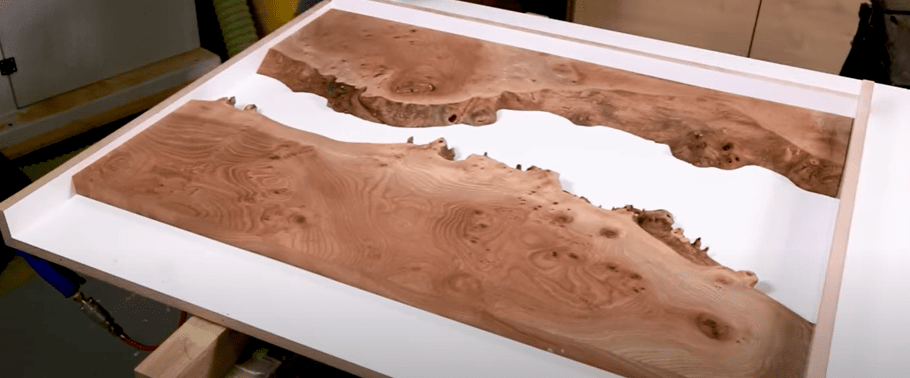
The foundation of your table lies in selecting the perfect wood planks. Choose planks with unique grain patterns, knots, or other natural features that will complement the epoxy river design. The wood species, color, and character will significantly impact the overall aesthetic.
Desired Shape and Design:
Before beginning, decide on the shape you envision for your dining table. Popular options include rectangular, oval, or even live-edge designs that embrace the natural curves of the wood. Sketch out your desired design or use templates to guide the frame construction.
👉 Decorative Elements:
One of the most exciting aspects of epoxy river tables is the ability to incorporate decorative elements within the epoxy itself. This could include:
- Dried flowers, leaves or faux flora
- Colored alcohol inks or dyes
- Metallic powders or glitters
- Found objects like shells, rocks or glass pieces
Carefully planning and gathering these decorative elements ahead of time allows you to create a truly unique and personalized river design within the epoxy.
3. What resin epoxy for a dining table epoxy?
For an epoxy river dining table, you’ll want to use an epoxy resin that is specifically designed for tabletops, countertops, and other high-traffic surfaces. Here are some recommended epoxy resins well-suited for this application:
- EnviroTex Lite Pour-On High Strength Epoxy Resin
This is a popular two-part epoxy resin that cures to a thick, durable, heat resistant and UV resistant finish. It’s ideal for coating surfaces that will see a lot of use like dining tables. - Pro Marine Supplies Epoxy Resin
This professional-grade two-component epoxy is formulated for thick pours up to 1.5 inches. It provides excellent clarity and resistance to scratches and chemicals once cured. - East Coast Resin Epoxy Resin
This epoxy has a long working time of 45-60 minutes which allows ample time for pouring and manipulating the epoxy river effect. It also resists yellowing over time. - Famowood Glaze Coat Epoxy Resin
With its self-leveling properties and high build capabilities, this epoxy can achieve the distinctive domed river effect desirable for dining tables.
No matter which epoxy you choose, make sure it specifies that it can be poured at least 1-2 inches thick and is rated for tabletops/counters to ensure it can properly cure and withstand the demands of a dining surface.
Of course, the star of the show is the epoxy resin itself. This is usually a two part system, the resin and hardener must be carefully measured according to the manufacturer’s instructions. This step is essential, because the right ratio guarantees complete curing and optimal strength.
4. Mold Construction: The Basis of Your Creation
📏 Build a flat mold using wood and silicone, making sure the surfaces are covered with release tape. This ensures that the resin does not stick to the mold and can be removed easily once cured.
5. Resin Mixing: The Science of Perfection
Mixing the Resin and Hardener: ⚖️
It is essential to mix the resin and hardener in the correct ratio to avoid bubbles. Use a mixing ratio formula to avoid bubbles and make sure the mixture is even before pouring.
To expand on this key step:
Epoxy resin typically comes as a two-part system – the resin itself and a hardener. Accurately measuring and thoroughly mixing these two components in the precise ratio specified by the manufacturer is crucial. Even a slight deviation can lead to issues like incomplete curing, surface imperfections, or trapped air bubbles.
Most epoxy makers provide a mixing ratio, such as 2 parts resin to 1 part hardener. Using a graduated container and carefully following this ratio ensures you achieve the desired chemical reaction for a proper cure. Many epoxy crafters use a “double cup” measuring technique to get the ratio perfect.
Once measured, mix the resin and hardener together thoroughly, ensuring no streaks or unmixed portions remain. Vigorous mixing introduces air bubbles, so mix slowly and methodically, scraping the sides and bottom periodically. An efficient mixing technique is to pour the mixture back and forth between two containers for 2-3 minutes.
⚠ 👉 Taking the time to properly mix in the correct ratio helps eliminate problematic air bubbles that can mar the beautiful epoxy river effect.
A smooth, well-mixed epoxy allows the “river” to flow naturally within the piece. This crucial step lays the foundation for a flawless finished dining table.
6. Epoxy resin casting: A Critical Moment
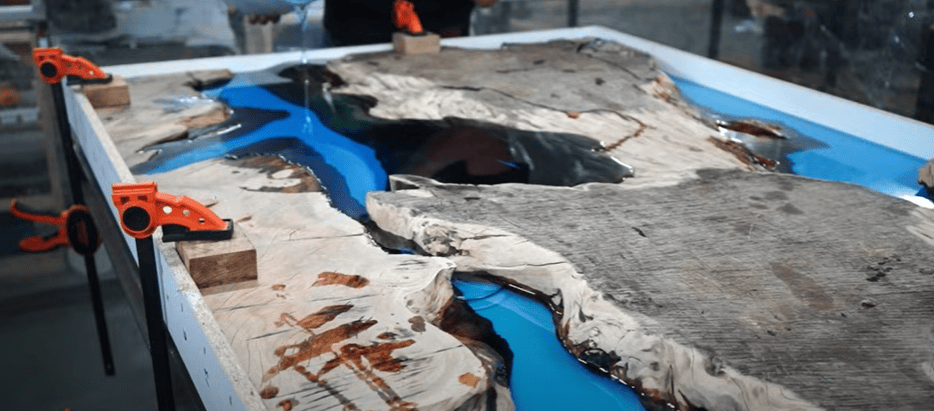
Adding Color and the Initial Pour
🎨 Add colorants to the resin according to your preferences, then pour a thin sealing coat to encase the surfaces and prevent air bubbles. Colorants like alcohol inks, dyes, or tints can create stunning visual effects within the epoxy river. Start with just a few drops and mix thoroughly, as a little color goes a long way.
Once colored, pour a thin initial layer of the epoxy mixture over the wood surface and into any embedded objects or decorative elements. This sealing coat helps minimize air bubbles from becoming trapped. Use a torch or heat gun to gently go over the surface and pop any small bubbles that do arise.
Temperature Considerations
🌡️ Consider the temperature when pouring the epoxy resin to avoid overheating or incomplete curing. Epoxy resin undergoes an exothermic reaction as it cures, generating heat. Pouring thick sections in warm environments can cause this heat buildup to intensify.
For large pours, like a dining table top, work in a temperature-controlled environment if possible. The ideal pour temperature is usually between 70°F-80°F. Temperatures outside this range can affect viscosity and cure times.
If the environment is cool, warm up the individual epoxy components first by submerging the bottles in hot water. Just be cautious not to overheat the liquids.
Properly managing the epoxy temperature prevents issues like surface wrinkling, soft spots, excessive bubbling or crazing. It ensures a smooth, blister-free finish on your epoxy river dining table.
7. Polishing: The Final Touch
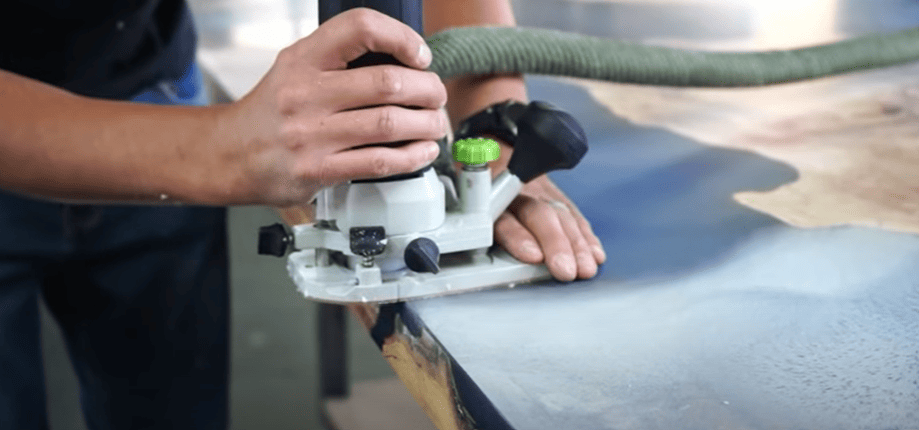
Sanding and Polishing: 🔬
After curing, sand and polish the table’s surface to achieve your desired level of smoothness and shine. This step transforms a simple wood plank into a glistening masterpiece.
To expand on this crucial finishing process:
Once the epoxy river has fully cured per the manufacturer’s instructions, it’s time to refine the surface. Start with a coarse grit sandpaper (80-100 grit) to level out any raised edges or imperfections in the epoxy. Be sure to sand the entire surface evenly.
Progress through successively higher grits (120, 220, 400) until the desired smoothness is achieved. The higher grits remove the scratches left behind by the previous grits. Frequent cleaning is required to remove the sanding dust between grits.
After sanding, the surface may still appear cloudy or matte. This is when polishing compounds and buffers come into play. Apply a plastic polish or epoxy polish with a cloth or polishing pad. Work in firm overlapping circles across the entire surface.
For a brilliant mirror-like finish, use a variable speed polisher fitted with a foam polishing pad and cutting compound. The heat generated helps to slowly melt and level the epoxy into a glassine finish.
This meticulous sanding and polishing transforms the epoxy river from a rough setting into a transparent glass-like region that highlights the embedded decorative elements.
The now smooth, glossy surface reflects light like liquid, creating an eye-catching dining centerpiece. It’s the final step that elevates a woodworking project into an artistic statement piece.
8. Design an Epoxy River dining table (video)

Q: What is the main focus of the video?
A: The main focus of the video is on the process of designing and manufacturing epoxy tables, with an emphasis on sharing valuable insights, tips, and techniques for successful execution.
Q: How does the video address the challenges of designing epoxy tables?
A: The video highlights the challenges of designing epoxy tables, particularly emphasizing the complexity involved in creating unique and non-traditional designs. It mentions spending significant time on the design process, taking approximately three hours for a specific project, to ensure a stunning outcome.
Q: How to deal with air bubbles in the epoxy casting process?
A: It is recommended to pour the epoxy slowly and run it along the edge of the table to minimize the formation of air bubbles.
Expert Tips for a Perfect River Epoxy Table
👉 Follow these additional steps:
- Build a formwork to the desired dimensions using four slats and a wooden board. Make sure the formwork is flat and structureless for a smooth finish.
- Cover all surfaces with release tape to prevent resin from sticking to the forms. Place the strips side by side or with a small gap between them to reduce sanding later.
- Glue the frame with silicone and screw everything together. Allow the silicone to harden before spraying the mold release spray on the mold.
- Place your wooden planks in the formwork. Make sure they are the same height and as straight as possible to minimize planing and sanding.
- Prepare the resin with a first coat of mixture to seal the surface of the wood and prevent bubbles from forming.
- Use our quantity calculator to determine the amount of epoxy resin needed, by entering the dimensions of the area to be covered.
- Weigh the resin and hardener in the appropriate mixing ratio and mix the components together. To reduce the formation of bubbles, mix the rim and bottom of the mixing cup well.
- Apply the resin with a brush to the desired surface. If air chambers form between the wooden planks and the formwork, apply a thin layer of 2 to 3 mm to close them.
- Pour the epoxy immediately after mixing onto the surface to be covered. Allow the resin to harden until it is no longer sticky before continuing.
FAQ: Designing an Epoxy River Dining Table
Q: What u003cstrongu003etools are needed to build the formwork for pouring the epoxy resin table?u003c/strongu003e
A: You will need wooden or polypropylene boards, silicone sealant, a screwdriver or drill, anti-adhesive tape, release spray without silicone, a folding ruler, a bubble level, scissors, and a clean cloth or kitchen roll.
Q: How can one calculate the amount of epoxy resin needed for a project?
A: You can determine the quantity of epoxy resin required by using the u003ca href=u0022https://deco-originale.fr/eng/diy-table-epoxy-in-resin-kit-advice/u0022 data-type=u0022linku0022 data-id=u0022https://deco-originale.fr/eng/diy-table-epoxy-in-resin-kit-advice/u0022u003equantity calculator availableu003c/au003e on each product page. Input the length, width, and height of the area to be coated or poured.
Q: What precautions should be taken to avoid bubbles when applying epoxy resin?
A: To minimize bubble formation, hold the stirring bar at the bottom or edge of the mixing cup and pour slowly. Always ensure thorough mixing until the resin and hardener blend completely. Consider usingu003cstrongu003e the Pro+ system,u003c/strongu003e designed for thinner layers and quicker curing.
Q: Can I u003cstrongu003edrill an epoxy tableu003c/strongu003e?
A: Yes, it is possible to drill an epoxy table. However, it is important tou003cstrongu003e use the correct tools and techniques to avoid damaging the table or epoxy.u003c/strongu003e It is recommended to use a special drill bit for metal or plastic to cleanly drill the epoxy without risking cracking or breaking the surface. In addition, it is advisable to work slowly and carefully to obtain a precise and careful result.
Q: Can I put hot pans on the epoxy resin table?
A: It is recommended to use au003cstrongu003e trivet or insulatingu003c/strongu003e mat to protect the table surface and avoid any risk of long-term damage. It is best u003cstrongu003enot to place hot pans directlyu003c/strongu003e on the epoxy resin to ensure its durability.
Q: Can an u003cstrongu003eepoxy table be restoredu003c/strongu003e to its initial appearance after several months of use?
A: Yes ! To restore the luster and shine of the surface, you u003cstrongu003ecan gently polish the table with an epoxy resin polishu003c/strongu003e or a product specially designed to revive epoxy surfaces. It is also recommended to clean the table regularly with a soft, non-abrasive cloth to avoid the accumulation of dirt and dust which can tarnish its appearance. By caring for your epoxy table, you can extend its durability and keep it looking like new.
What type of wood do you recommend for making an epoxy table?
To make an epoxy table, it is u003cstrongu003erecommended to use hardwoods such as oak, walnut, ash or teak.u003c/strongu003e These types of wood are sturdy and durable, making them ideal for supporting epoxy resin and creating a strong, stable table. Additionally, the natural grains and patterns of the hardwood bring a u003cstrongu003ebeautiful aestheticu003c/strongu003e to the table when combined with the epoxy resin. Make sure you choose quality, well-dried wood to avoid any moisture or warping issues in your epoxy table manufacturing project.